FastAPI로 나만의 포럼 만들기: 5단계 - 게시물 수정
Min-jun Kim
Dev Intern · Leapcell
이전 글에서 포럼의 사용자 시스템을 구축했습니다. 이제 사용자는 자신의 신원으로 게시물을 등록, 로그인, 발행할 수 있습니다.
하지만 게시물이 발행된 후에는 현재 수정할 수 없습니다. 오류를 발견하거나 내용을 추가하고 싶다면 어떻게 해야 할까요?
이 글에서는 새로운 기능을 구현하여 사용자가 자신이 만든 게시물을 수정할 수 있도록 할 것입니다.
1단계: 게시물 수정 페이지 생성
먼저 사용자가 게시물의 제목과 내용을 수정할 수 있는 새로운 HTML 페이지가 필요합니다. 이 페이지는 새 게시물 양식과 매우 유사하지만, 게시물의 기존 데이터로 미리 채워집니다.
templates 폴더에 edit_post.html이라는 새 파일을 만듭니다.
templates/edit_post.html
<!DOCTYPE html>
<html>
  <head>
    <title>Edit Post - My FastAPI Forum</title>
    <style>
      body {
        font-family: sans-serif;
        margin: 2em;
      }
      form {
        width: 500px;
        margin: 0 auto;
      }
      input,
      textarea {
        width: 100%;
        padding: 8px;
        margin-bottom: 10px;
        box-sizing: border-box;
      }
      button {
        padding: 10px 15px;
        background-color: #007bff;
        color: white;
        border: none;
        cursor: pointer;
      }
      a {
        display: block;
        margin-top: 1em;
        text-align: center;
      }
    </style>
  </head>
  <body>
    <h1>Edit Post</h1>
    <form method="post">
      <input type="text" name="title" value="{{ post.title }}" required /><br />
      <textarea name="content" rows="10" required>{{ post.content }}</textarea
      ><br />
      <button type="submit">Update Post</button>
    </form>
    <a href="/posts">Cancel</a>
  </body>
</html>
이 템플릿의 핵심은 title과 content의 두 입력 필드가 있는 양식입니다. Jinja2의 {{ post.title }} 및 {{ post.content }} 구문을 사용하여 백엔드에서 전달된 게시물 데이터로 양식을 미리 채웁니다.
2단계: 수정을 위한 API 라우트 추가
다음으로 main.py에 두 개의 새 라우트를 추가하여 수정 로직을 처리해야 합니다. main.py 파일을 열고 다음 코드를 추가합니다.
main.py (새 라우트 추가)
# ... (이전 가져오기 및 앱, 템플릿 정의는 변경되지 않은 상태로 유지) ...

# --- Routes ---

# ... (/, /posts, /api/posts와 같은 이전 라우트는 변경되지 않은 상태로 유지) ...

@app.get("/posts/{post_id}/edit", response_class=HTMLResponse)
async def get_edit_post_form(
    request: Request,
    post_id: int,
    db: AsyncSession = Depends(get_db),
    current_user: Optional[models.User] = Depends(get_current_user)
):
    if not current_user:
        return RedirectResponse(url="/login", status_code=status.HTTP_302_FOUND)

    result = await db.execute(select(models.Post).where(models.Post.id == post_id))
    post = result.scalar_one_or_none()

    if not post:
        raise HTTPException(status_code=404, detail="Post not found")

    if post.owner_id != current_user.id:
        raise HTTPException(status_code=403, detail="Not authorized to edit this post")

    return templates.TemplateResponse("edit_post.html", {"request": request, "post": post})


@app.post("/posts/{post_id}/edit")
async def edit_post(
    post_id: int,
    title: str = Form(...),
    content: str = Form(...),
    db: AsyncSession = Depends(get_db),
    current_user: Optional[models.User] = Depends(get_current_user)
):
    if not current_user:
        return RedirectResponse(url="/login", status_code=status.HTTP_302_FOUND)

    result = await db.execute(select(models.Post).where(models.Post.id == post_id))
    post = result.scalar_one_or_none()

    if not post:
        raise HTTPException(status_code=404, detail="Post not found")

    if post.owner_id != current_user.id:
        raise HTTPException(status_code=403, detail="Not authorized to edit this post")

    post.title = title
    post.content = content
    await db.commit()

    return RedirectResponse(url="/posts", status_code=status.HTTP_303_SEE_OTHER)

# ... (이후 /register, /login, /logout과 같은 라우트는 변경되지 않은 상태로 유지) ...
여기에서 두 개의 라우트를 추가했습니다.
GET /posts/{post_id}/edit: 이 라우트는 URL의post_id를 기반으로 데이터베이스에서 게시물을 찾습니다. 그런 다음post.owner_id가current_user.id와 일치하는지 확인합니다. 유효성 검사가 통과하면 쿼리된post객체를 전달하여edit_post.html템플릿을 렌더링합니다.POST /posts/{post_id}/edit: 이 라우트는 양식에서 새title및content를 수신하고post객체의 속성을 업데이트합니다. 이 작업은 로그인 상태와 게시물 소유권도 확인합니다.
3단계: 메인 페이지에 진입점 추가
라우트가 준비되었습니다. 다음으로 사용자가 수정 페이지에 액세스할 수 있도록 게시물에 대한 진입점을 추가해야 합니다.
templates/posts.html 파일을 수정합니다.
templates/posts.html (업데이트됨)
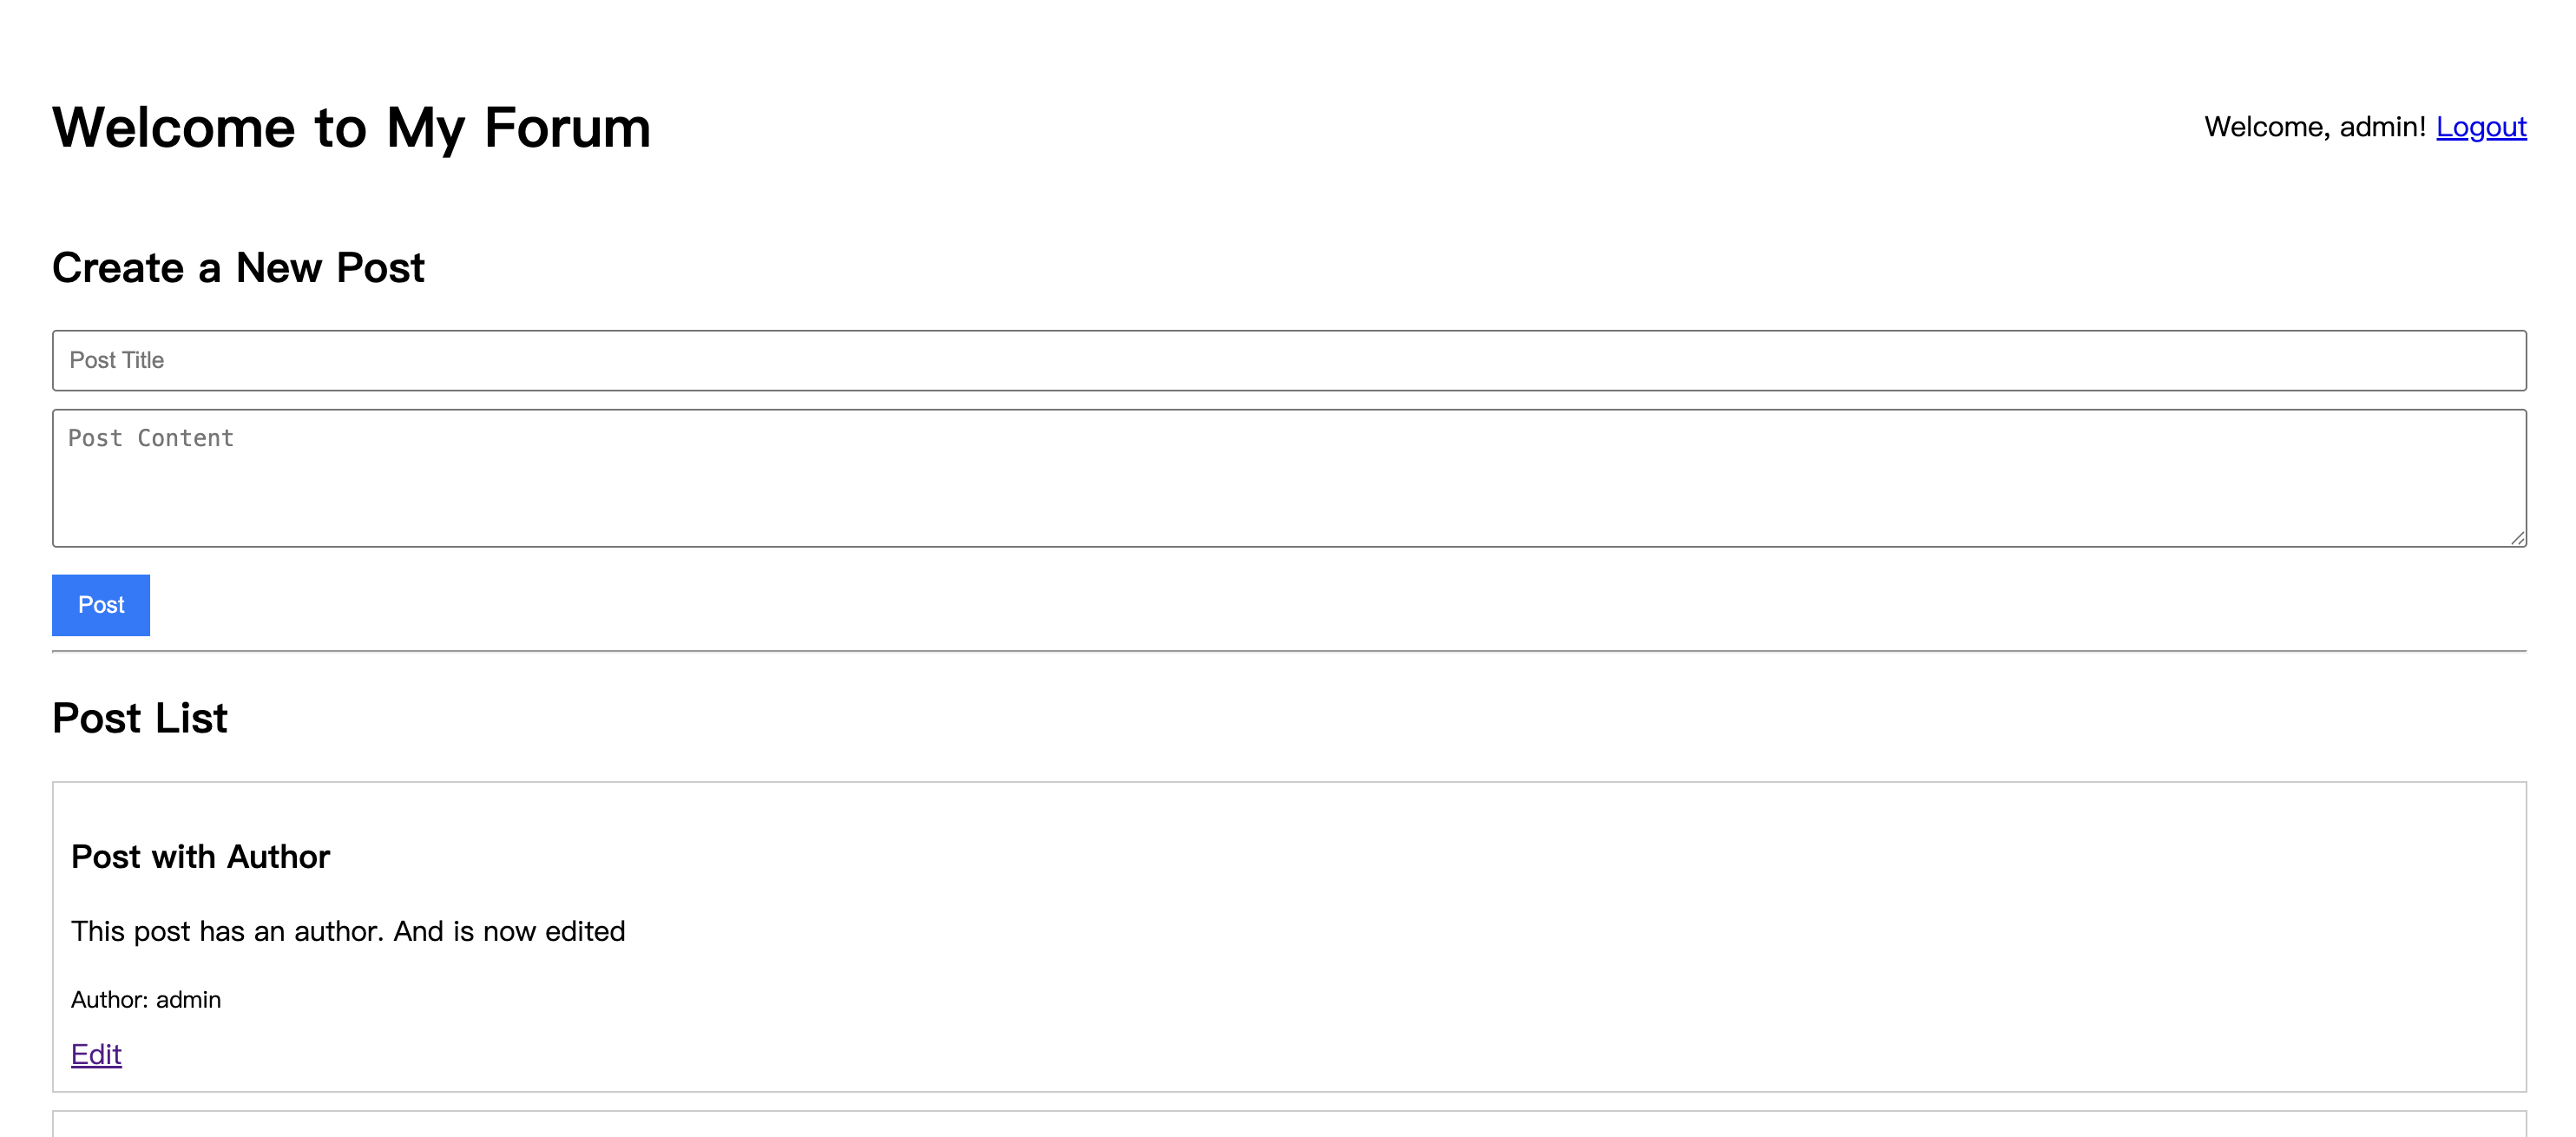
... (파일 헤더 및 스타일 시트는 변경되지 않은 상태로 유지) ...
<body>
    ... (헤더 및 새 게시물 양식 섹션은 변경되지 않은 상태로 유지) ...

    <hr />
    <h2>Post List</h2>

    {% for post in posts %}
    <div style="border: 1px solid #ccc; padding: 10px; margin-bottom: 10px;">
      <h3>{{ post.title }}</h3>
      <p>{{ post.content }}</p>
      <small>Author: {{ post.owner.username if post.owner else 'Unknown' }}</small>

      {% if current_user and post.owner_id == current_user.id %}
      <div style="margin-top: 10px;">
        <a href="/posts/{{ post.id }}/edit">Edit</a>
      </div>
      {% endif %}
    </div>
    {% endfor %}
</body>
</html>
게시물 정보 아래에 Jinja2 조건부 문장 {% if current_user and post.owner_id == current_user.id %}를 추가했습니다.
현재 사용자가 로그인되어 있고(current_user가 존재하고) 게시물의 owner_id가 현재 사용자의 id와 일치하면 /posts/{{ post.id }}/edit으로 연결되는 "Edit" 링크가 표시됩니다.
이런 식으로 사용자는 자신의 게시물에서만 편집 버튼을 볼 수 있으며 다른 사람의 게시물은 편집할 수 없습니다.
실행 및 확인
uvicorn 서버를 다시 시작합니다.
uvicorn main:app --reload
http://127.0.0.1:8000으로 이동하여 로그인합니다.
이전에 발행한 게시물을 찾으면 아래에 "Edit" 링크가 표시됩니다. 다른 사용자의 게시물에는 "Edit" 링크가 표시되지 않습니다.
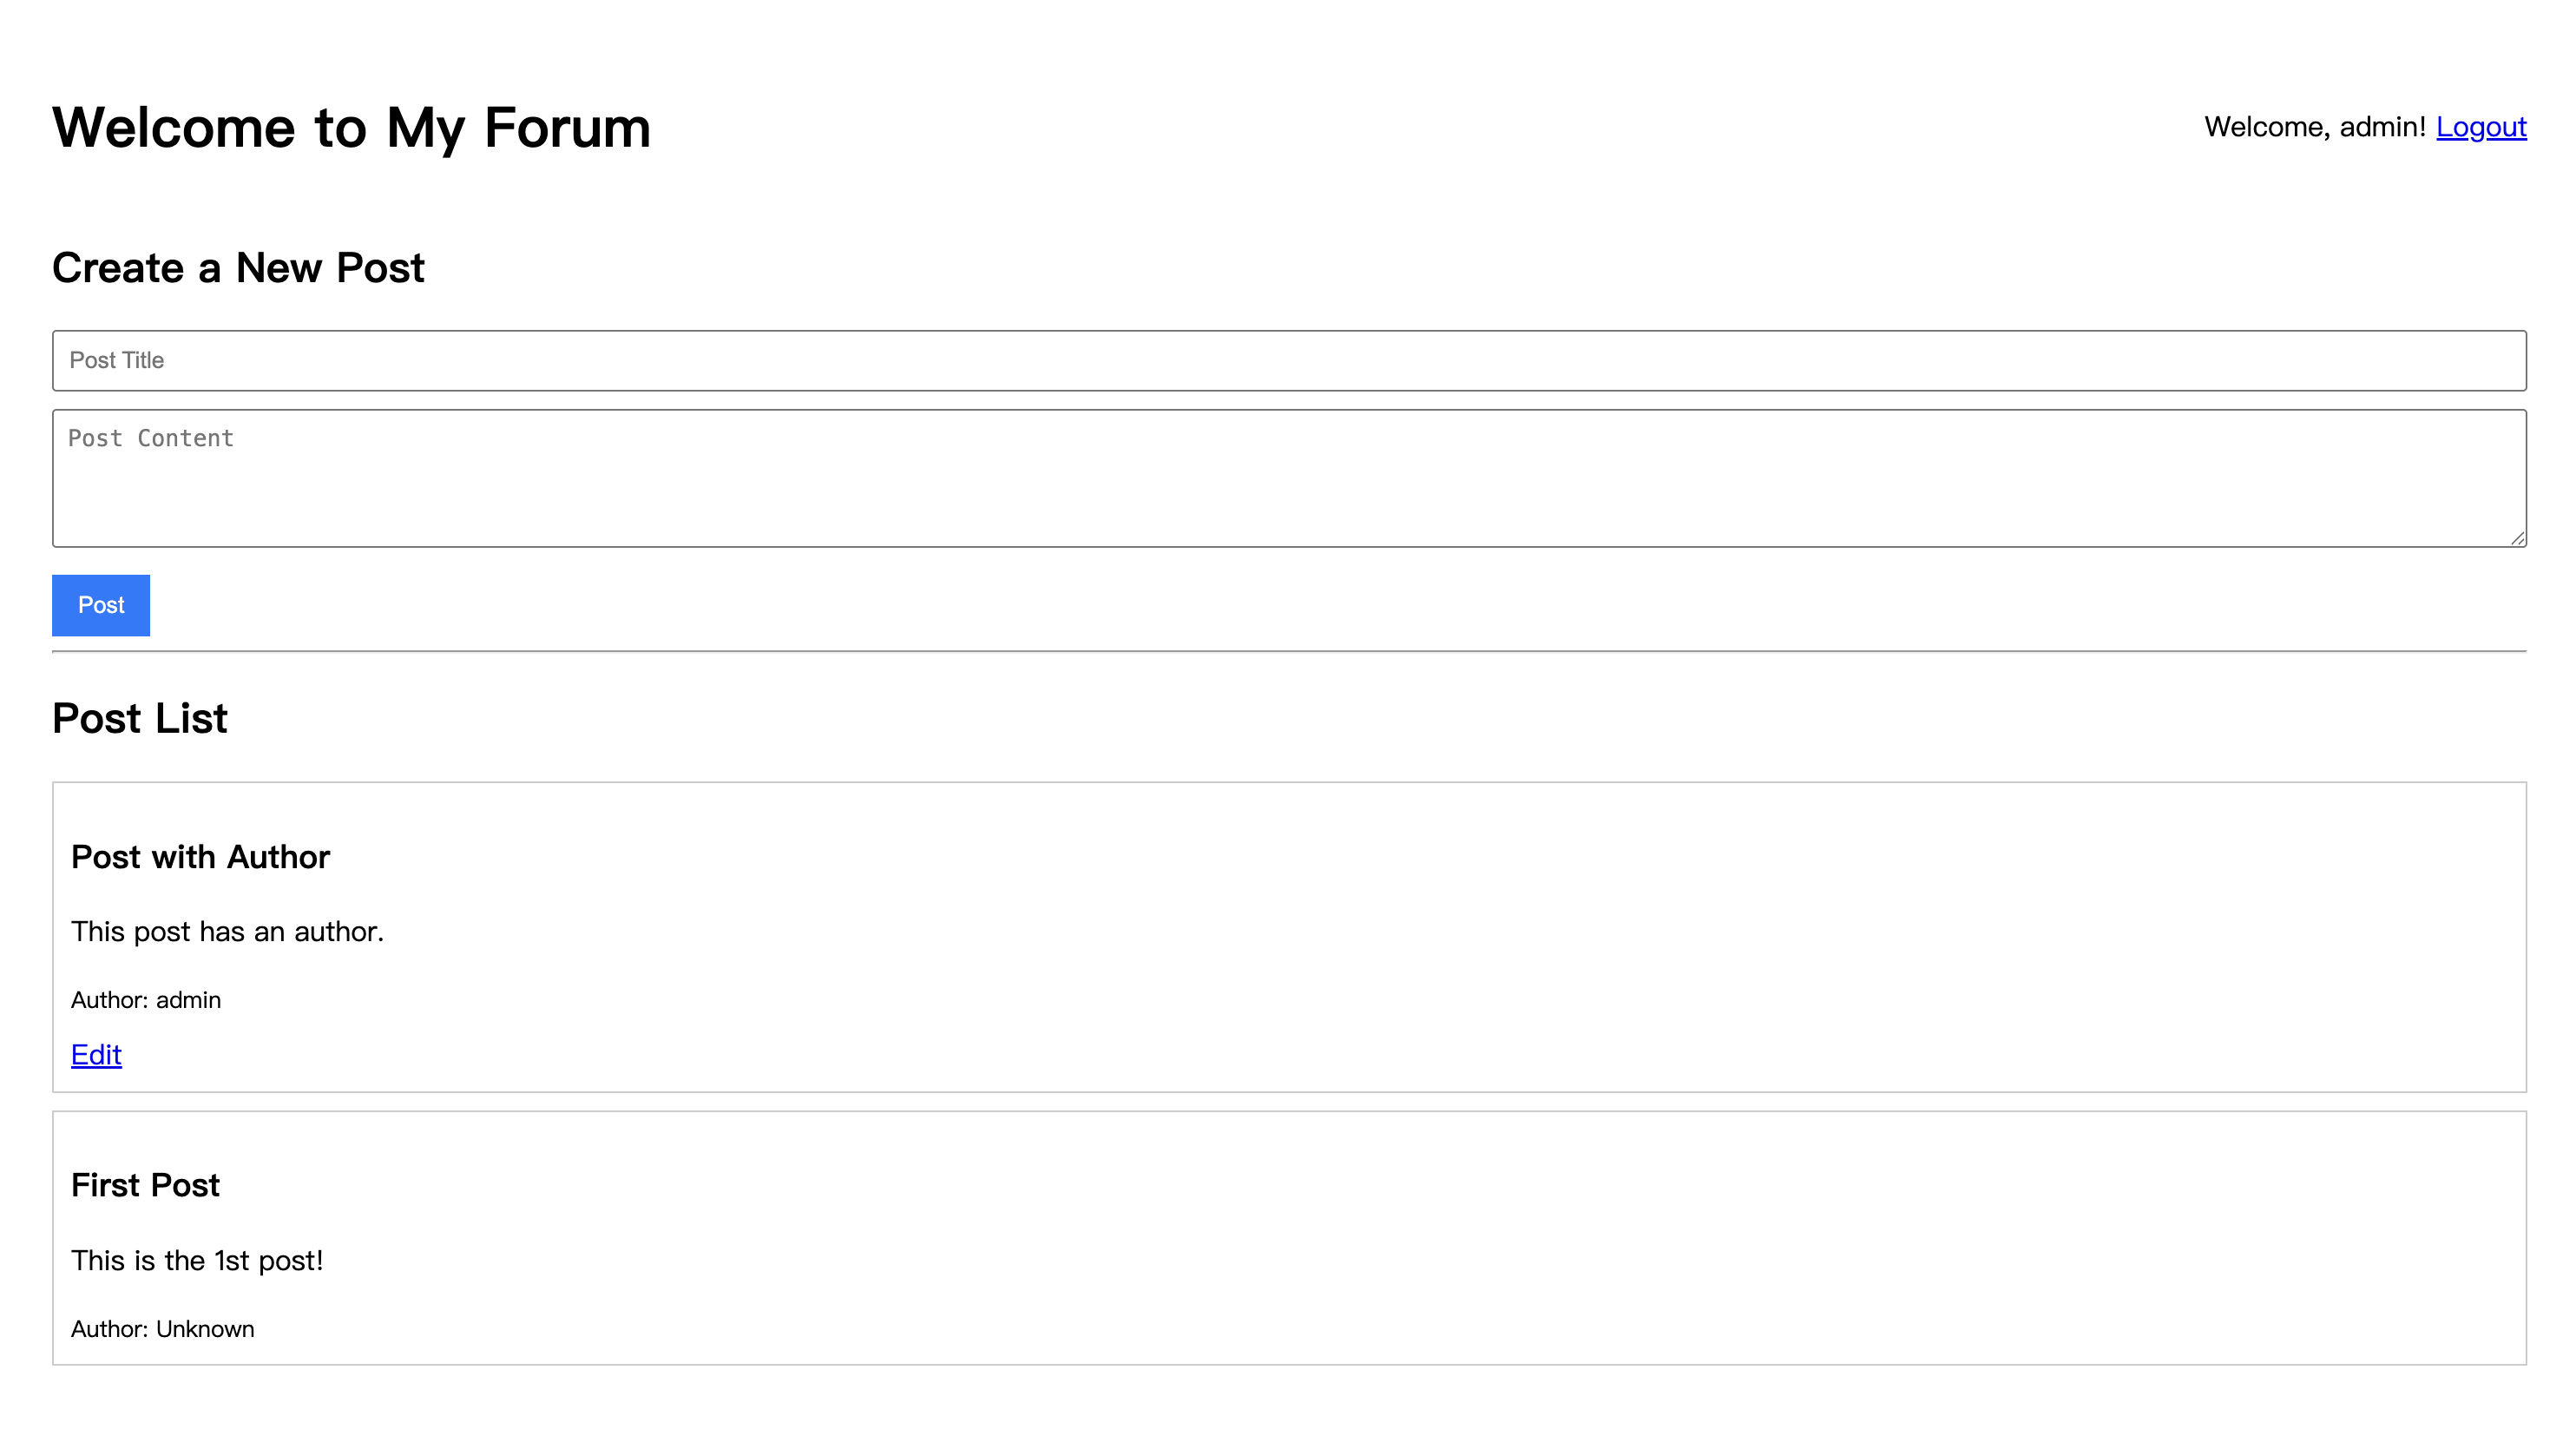
"Edit"를 클릭하면 게시물의 원래 제목과 내용으로 미리 채워진 편집 양식으로 페이지가 리디렉션됩니다.
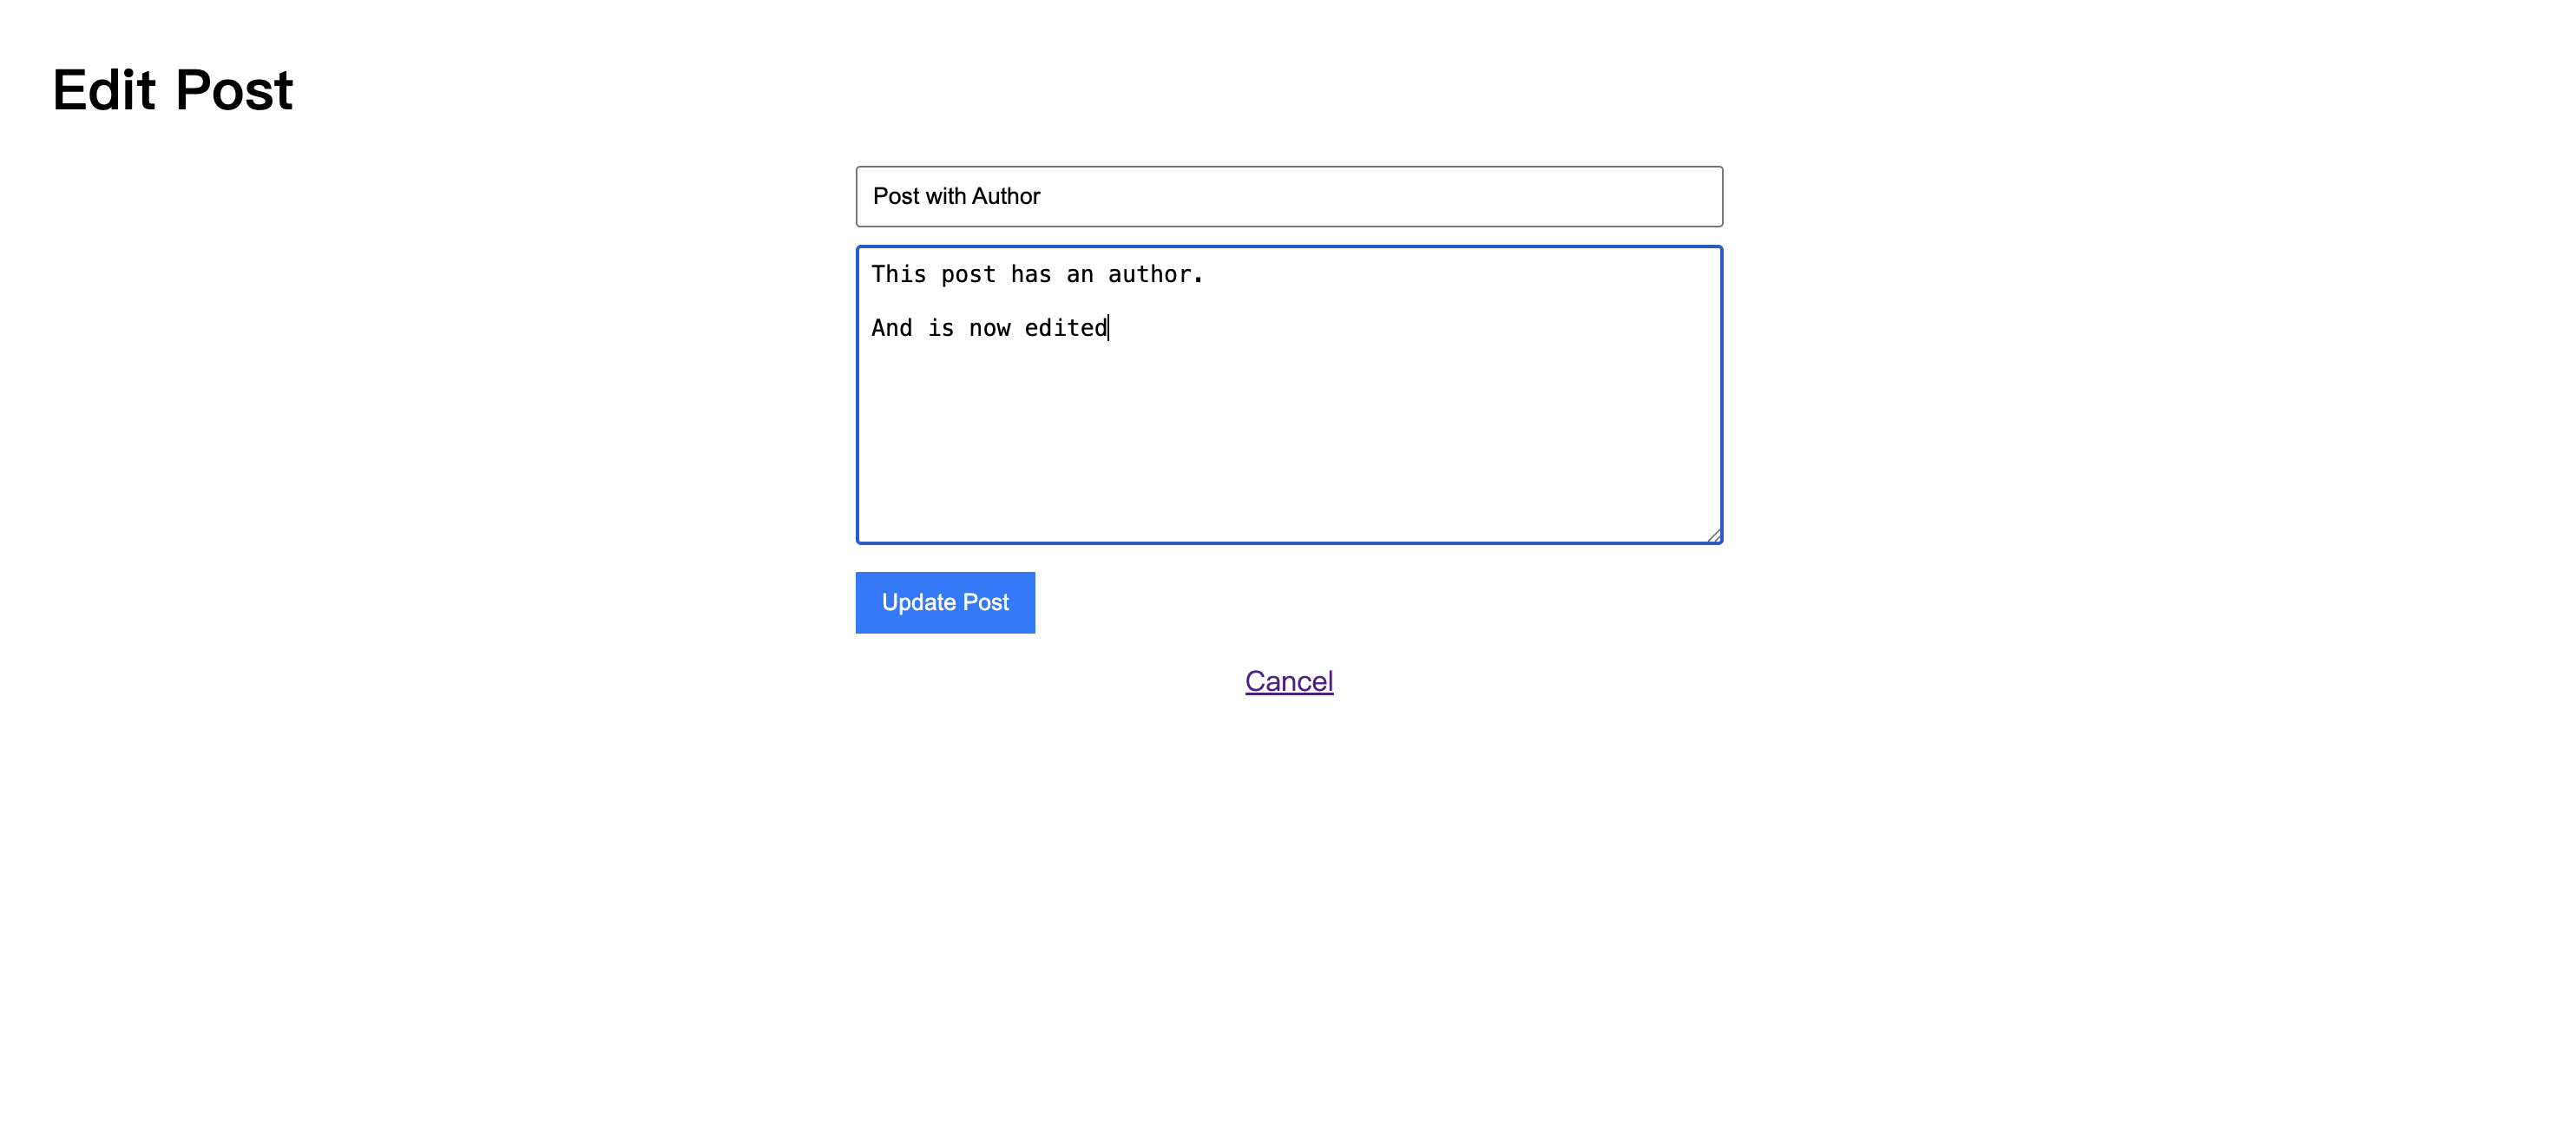
내용을 수정하고 "Update Post"를 클릭합니다. 페이지가 홈페이지로 다시 리디렉션되면 게시물 내용이 성공적으로 업데이트된 것을 볼 수 있습니다.
프로젝트 온라인 배포
첫 번째 튜토리얼과 마찬가지로 이 단계의 결과를 온라인에 배포하여 친구들이 프로젝트의 변경 사항과 진행 상황을 경험하게 할 수 있습니다.
간단한 배포 솔루션은 Leapcell을 사용하는 것입니다.

이전에 배포한 적이 있다면 코드를 Git 저장소에 푸시하기만 하면 Leapcell이 자동으로 최신 코드를 다시 배포합니다.
Leapcell의 배포 서비스를 사용한 적이 없다면 이 기사의 튜토리얼을 참조하세요.
요약
포럼에 편집 기능이 생긴 지금, 더 완전해졌습니다.
게시 외에도 상호 작용은 포럼에 필수적입니다. 사용자가 흥미로운 (또는 논란의 여지가 있는) 게시물을 보면 그 아래에 자신의 의견을 공유하고 싶을 것입니다.
다음 글에서는 포럼에 대화형 기능을 추가하여 게시물에 대한 댓글 및 답글을 구현하여 사용자가 게시물 주위에서 토론할 수 있도록 할 것입니다.