Build a Short Link Service Using Nest.js
Takashi Yamamoto
Infrastructure Engineer · Leapcell

What is a Short Link?
When you surf the internet, you've probably often seen links like t.cn/A67x8Y or bit.ly/3z4aBc. They are usually quite short, and clicking on them redirects you to a page with a completely different domain name than the original one.
These links are short links.
Why Are Short Links Needed?
Short links came into being during the early days of Twitter when there were strict character limits. At that time, their main purpose was to save characters and prevent links from taking up valuable space.
As short links became more widespread, the "shortness" of the link itself became less important. More uses were developed:
- Data Analytics: Short link services often provide click statistics, making it easy for users to understand the number of clicks and the link's dissemination effectiveness.
- Bypass Blocking: Some software, like Safari and certain email clients, is very strict about link tracking and will automatically clean tracking parameters from links. Using a short link can avoid this issue.
- Aesthetics: Short links are clean and concise, making them suitable for sharing in plain text scenarios like social media and text messages, which simplifies formatting.
How Short Links Work
The short link process is divided into two steps:
Creating a Short Link:
- A user submits a long URL to our service.
- Our service generates a unique identifier for it (e.g.,
aK8xLq). - The service stores the mapping between this "code" and the original long URL in a database.
- The identifier is returned to the user.
Redirecting to the Original Link from a Short Link:
- When someone clicks
https://short.url/aK8xLq, the browser sends a request to our server. - The server parses the identifier
aK8xLqfrom the URL path. - The server queries the database for this identifier to find the corresponding original long URL.
- The server returns a redirect status code (301/302) to the browser and includes the original long URL in the
Locationfield of the response header. - Upon receiving this response, the browser automatically redirects to the long URL specified in the
Locationfield.
How the Identifier is Generated
Hash algorithms are commonly used for generation.
- Generate a Hash: Use the long URL itself, or the long URL plus a "salt" (a random string), as input for a hash algorithm like MD5 or SHA1 to generate a digest.
- Truncate a Segment: The previous step generates a string. We can take a segment of it (e.g., the first 6 characters) as the short code.
- Handle Collisions: Two different long URLs might generate the same short code. Before saving a short code to the database, we must check if it already exists. If it does, we can take a different segment or regenerate the short code.
Building Your Own Short Link Service
A short link service consists of two main functional modules:
- Nest.js
- PostgreSQL, as the database
1. Initialize the Project
Install the Nest.js CLI:
npm i -g @nestjs/cli
Create a new project using the CLI:
nest new url-shortener
This will create a new folder named url-shortener and install all the necessary dependencies. Open this directory in your favorite editor to start coding.
2. Connect to the PostgreSQL Database
Next, we will integrate a PostgreSQL database. Following the official recommendation, we'll use TypeORM as the ORM. An ORM's role is to integrate the database into our code.
Install Dependencies
npm install @nestjs/typeorm typeorm pg # For PostgreSQL integration
npm install @nestjs/config class-validator class-transformer # For interface parameter validation
Set up a Database
To simplify the steps, we won't install and build a database locally. Instead, we'll request an online one.
We can get a free database with one click on Leapcell.

After registering for an account on the website, click "Create Database".
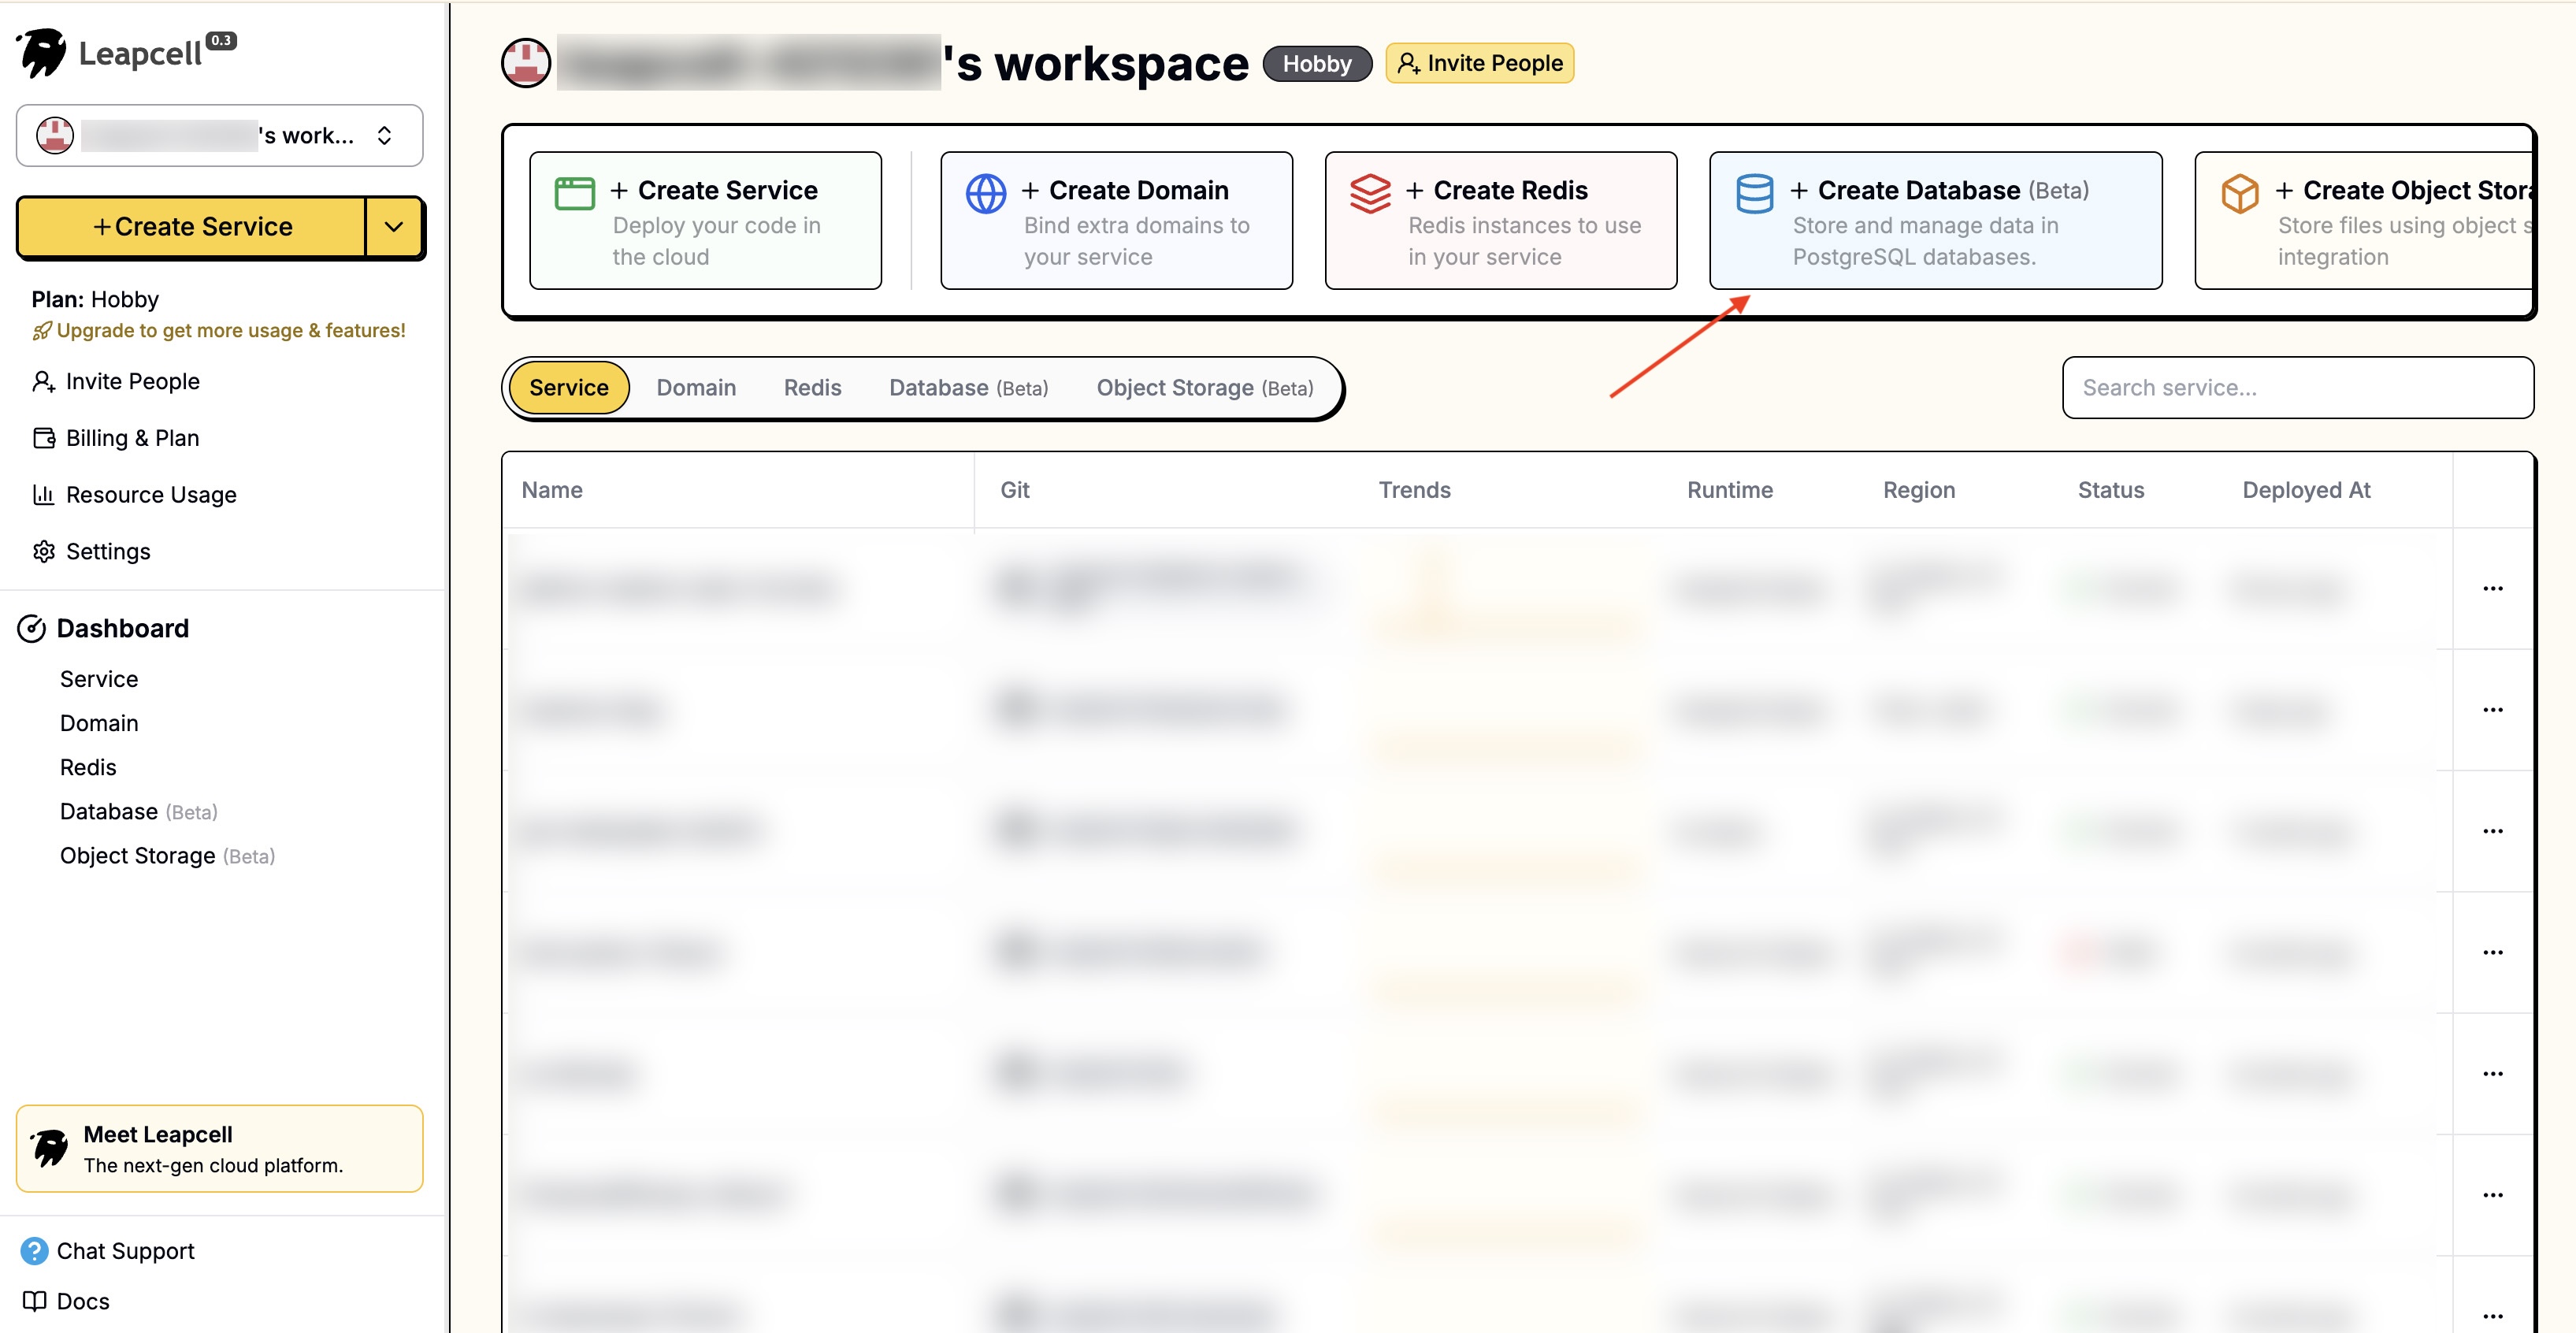
Enter a Database name and select a deployment region to create the PostgreSQL database.
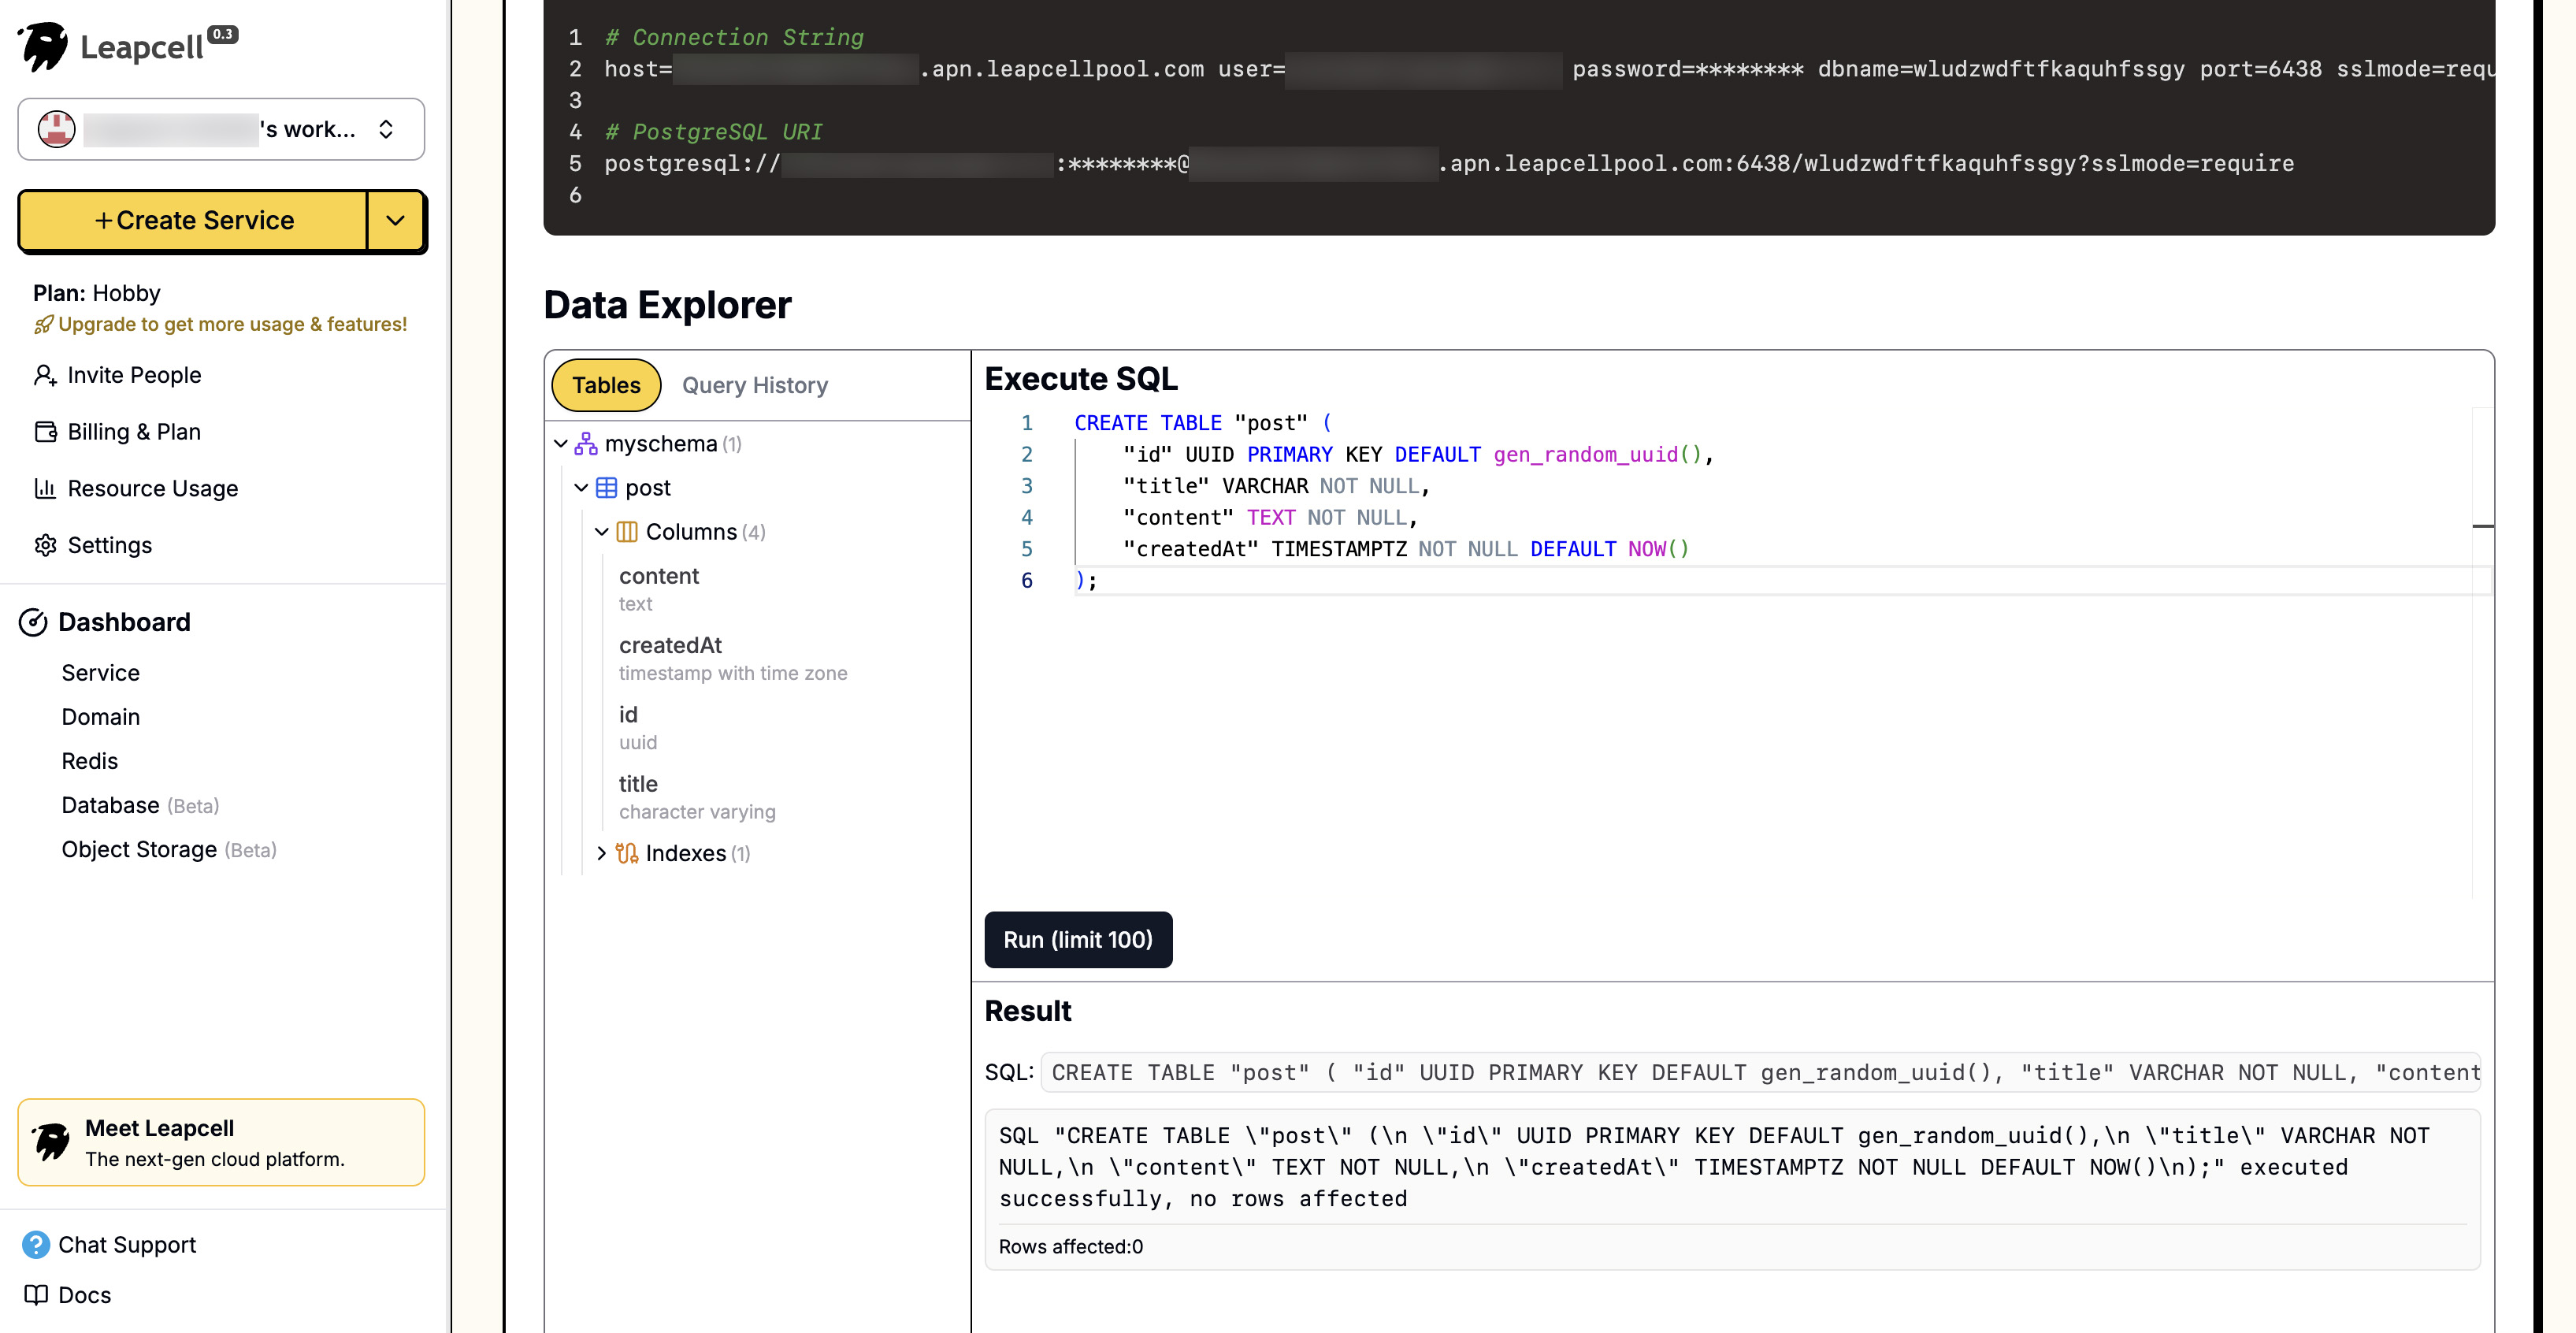
On the new page, you will see the information required to connect to the database. At the bottom, a control panel allows you to read and modify the database directly on the webpage.
Configure the Database Connection
Open the src/app.module.ts file and import TypeOrmModule.
Fill in the connection information using the database credentials you obtained from Leapcell. Note that ssl must be set to true, otherwise the connection will fail.
import { Module } from '@nestjs/common';
import { TypeOrmModule } from '@nestjs/typeorm';
import { AppController } from './app.controller';
import { AppService } from './app.service';

@Module({
  imports: [
    TypeOrmModule.forRoot({
      type: 'postgres',
      host: 'your_postgres_host',
      port: 5432,
      username: 'your_postgres_username', // Replace with your PostgreSQL username
      password: 'your_postgres_password', // Replace with your PostgreSQL password
      database: 'your_postgres_db', // Replace with your database name
      schema: 'myschema',
      entities: [__dirname + '/**/*.entity{.ts,.js}'],
      synchronize: true, // Set to true in development; it automatically syncs the DB structure
      ssl: true, // Required for services like Leapcell
    }),
  ],
  controllers: [AppController],
  providers: [AppService],
})
export class AppModule {}
Create the Short Link Module
Next, create a module to manage short links.
You can quickly generate the necessary files using the Nest CLI:
nest generate resource short-link
Afterward, we need to create the ShortLink entity file to connect it with the database. Create a file named short-link.entity.ts in the src/short-link directory:
// src/short-link/short-link.entity.ts
import { Entity, Column, PrimaryGeneratedColumn, CreateDateColumn, Index } from 'typeorm';

@Entity()
export class ShortLink {
  @PrimaryGeneratedColumn('uuid')
  id: string;

  @Column({ unique: true })
  @Index() // Create an index on shortCode to speed up queries
  shortCode: string;

  @Column({ type: 'text' })
  longUrl: string;

  @CreateDateColumn()
  createdAt: Date;
}
Next, create a DTO (Data Transfer Object). The DTO is used to validate incoming request data, ensuring we receive a URL in a valid format.
// src/short-link/dto/create-short-link.dto.ts
import { IsUrl } from 'class-validator';

export class CreateShortLinkDto {
  @IsUrl({}, { message: 'Please provide a valid URL.' })
  url: string;
}
Now we need to connect to the database.
Register TypeOrmModule in ShortLinkModule: open src/short-link/short-link.module.ts and import TypeOrmModule.forFeature([ShortLink]).
// src/short-link/short-link.module.ts
import { Module } from '@nestjs/common';
import { TypeOrmModule } from '@nestjs/typeorm';
import { ShortLinkController } from './short-link.controller';
import { ShortLinkService } from './short-link.service';
import { ShortLink } from './short-link.entity';

@Module({
  imports: [TypeOrmModule.forFeature([ShortLink])],
  controllers: [ShortLinkController],
  providers: [ShortLinkService],
})
export class ShortLinkModule {}
Go to the database details page on Leapcell and execute the following command in the web editor to generate the corresponding table:
CREATE TABLE "short_link" (
    "id" UUID PRIMARY KEY DEFAULT gen_random_uuid(),
    "shortCode" VARCHAR(255) NOT NULL UNIQUE,
    "longUrl" TEXT NOT NULL,
    "createdAt" TIMESTAMPTZ NOT NULL DEFAULT NOW()
);

CREATE INDEX "IDX_short_code" ON "short_link" ("shortCode");
Create the Short Link Service
The ShortLinkService will be responsible for handling all business logic related to short links. Open src/short-link/short-link.service.ts and add the following code:
// src/short-link/short-link.service.ts
import { Injectable, InternalServerErrorException } from '@nestjs/common';
import { InjectRepository } from '@nestjs/typeorm';
import { Repository } from 'typeorm';
import { ShortLink } from './short-link.entity'; // Corrected import path
import * as crypto from 'crypto';

@Injectable()
export class ShortLinkService {
  constructor(
    @InjectRepository(ShortLink)
    private readonly shortLinkRepository: Repository<ShortLink>
  ) {}

  // Find a link by its shortCode
  async findOneByCode(shortCode: string): Promise<ShortLink | null> {
    return this.shortLinkRepository.findOneBy({ shortCode });
  }

  // Create a new short link
  async create(longUrl: string): Promise<ShortLink> {
    // Check if the long link already exists; if so, return it to avoid duplicates
    const existingLink = await this.shortLinkRepository.findOneBy({ longUrl });
    if (existingLink) {
      return existingLink;
    }

    // Generate a unique shortCode
    const shortCode = await this.generateUniqueShortCode(longUrl);

    // Save to the database
    const newLink = this.shortLinkRepository.create({
      longUrl,
      shortCode,
    });

    return this.shortLinkRepository.save(newLink);
  }

  /**
   * Generate a hashed short code and handle collisions
   * @param longUrl The original URL
   */
  private async generateUniqueShortCode(longUrl: string): Promise<string> {
    const HASH_LENGTH = 7; // Define our desired short code length
    let attempt = 0; // Attempt counter

    // Set a maximum number of attempts to prevent an infinite loop
    while (attempt < 10) {
      // Salted hash: add the attempt number as a "salt" to ensure a different hash each time
      const salt = attempt > 0 ? String(attempt) : '';
      const hash = crypto
        .createHash('sha256')
        .update(longUrl + salt)
        .digest('base64url') // Use base64url for URL-safe characters
        .substring(0, HASH_LENGTH);

      const linkExists = await this.findOneByCode(hash);

      if (!linkExists) {
        // If the hash code doesn't exist in the database, it's unique and can be returned
        return hash;
      }

      // If it exists (a collision occurred), increment the attempt counter, and the loop will continue
      attempt++;
    }

    // If a unique code cannot be found after multiple attempts, throw an error
    throw new InternalServerErrorException(
      'Could not generate a unique short link. Please try again.'
    );
  }
}
Create the Short Link Controller
The controller is responsible for handling HTTP requests, calling the service, and returning a response. Open src/short-link/short-link.controller.ts and add the following code:
// src/short-link/short-link.controller.ts
import { Controller, Get, Post, Body, Param, Res, NotFoundException } from '@nestjs/common';
import { Response } from 'express';
import { ShortLinkService } from './short-link.service';
import { CreateShortLinkDto } from './dto/create-short-link.dto';

@Controller()
export class ShortLinkController {
  constructor(
    private readonly shortLinkService: ShortLinkService,
  ) {}

  @Post('shorten')
  async createShortLink(@Body() createShortLinkDto: CreateShortLinkDto) {
    const link = await this.shortLinkService.create(createShortLinkDto.url);

    return {
      shortCode: link.shortCode,
    };
  }

  @Get(':shortCode')
  async redirect(@Param('shortCode') shortCode: string, @Res() res: Response) {
    const link = await this.shortLinkService.findOneByCode(shortCode);

    if (!link) {
      throw new NotFoundException('Short link not found.');
    }

    // Perform the redirect
    return res.redirect(301, link.longUrl);
  }
}
Start the Project
Enable DTO validation in src/main.ts:
import { NestFactory } from '@nestjs/core';
import { AppModule } from './app.module';
import { ValidationPipe } from '@nestjs/common';

async function bootstrap() {
  const app = await NestFactory.create(AppModule);
  app.useGlobalPipes(new ValidationPipe()); // Add this line
  await app.listen(3000);
}
bootstrap();
Run the following command in the terminal to start the project:
npm run start:dev
Execute the following command in your console to create a short link:
curl -X POST http://localhost:3000/shorten \
-H "Content-Type: application/json" \
-d '{"url": "https://www.google.com/search?q=nestjs+url+shortener"}'

# Response: {"shortCode":"some-hash"}
Access the short link:
Use the shortCode returned in the previous step to construct the full URL, http://localhost:3000/some-hash, and open it in your browser. You will be automatically redirected to the Google search page.
You can continue to enhance this short link service, for example, by logging the number of visits, visitors' IP addresses, etc.
Deploying the Short Link Service Online
Now you might be thinking, how can I deploy this service online so my short links can be shared on the internet?
Remember Leapcell, which we used to create the database? Leapcell can do more than just create databases; it is also a web app hosting platform that can host projects in various languages and frameworks, including Nest.js, of course.
Follow the steps below:
- Push your project to GitHub. You can refer to GitHub's official documentation for the steps. Leapcell will pull the code from your GitHub repository later.
- Click "Create Service" on the Leapcell page.
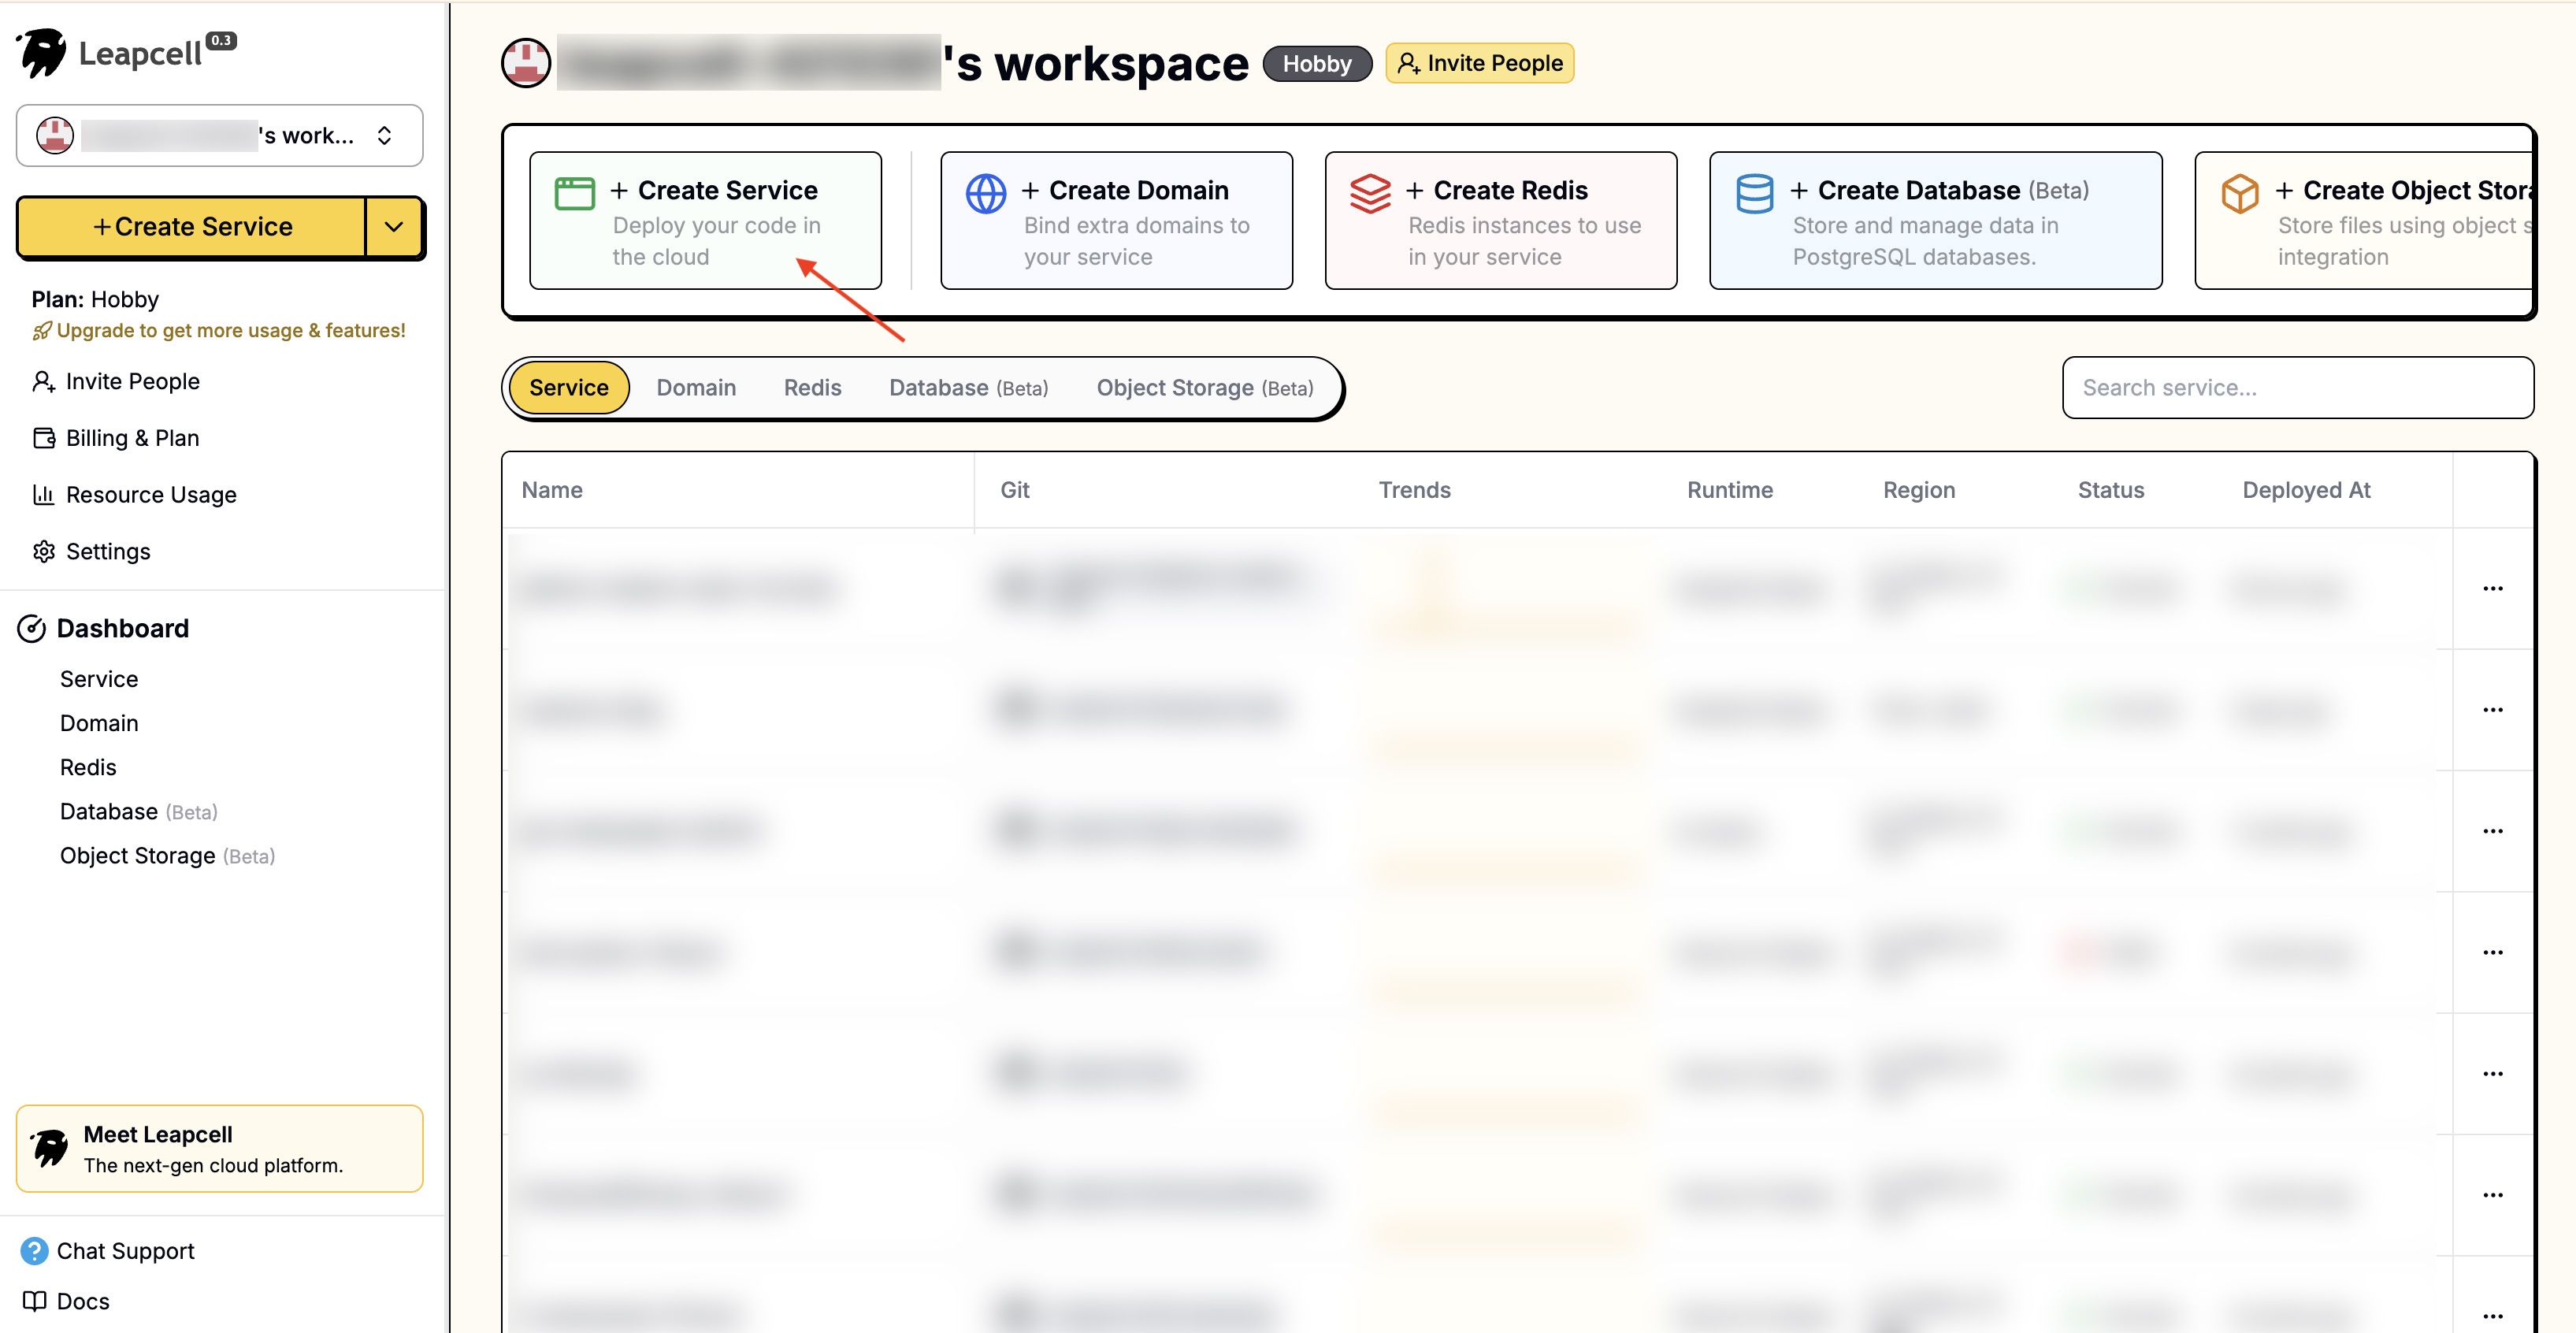
- After choosing your Nest.js repo, you'll see Leapcell has auto-populated the necessary configurations.
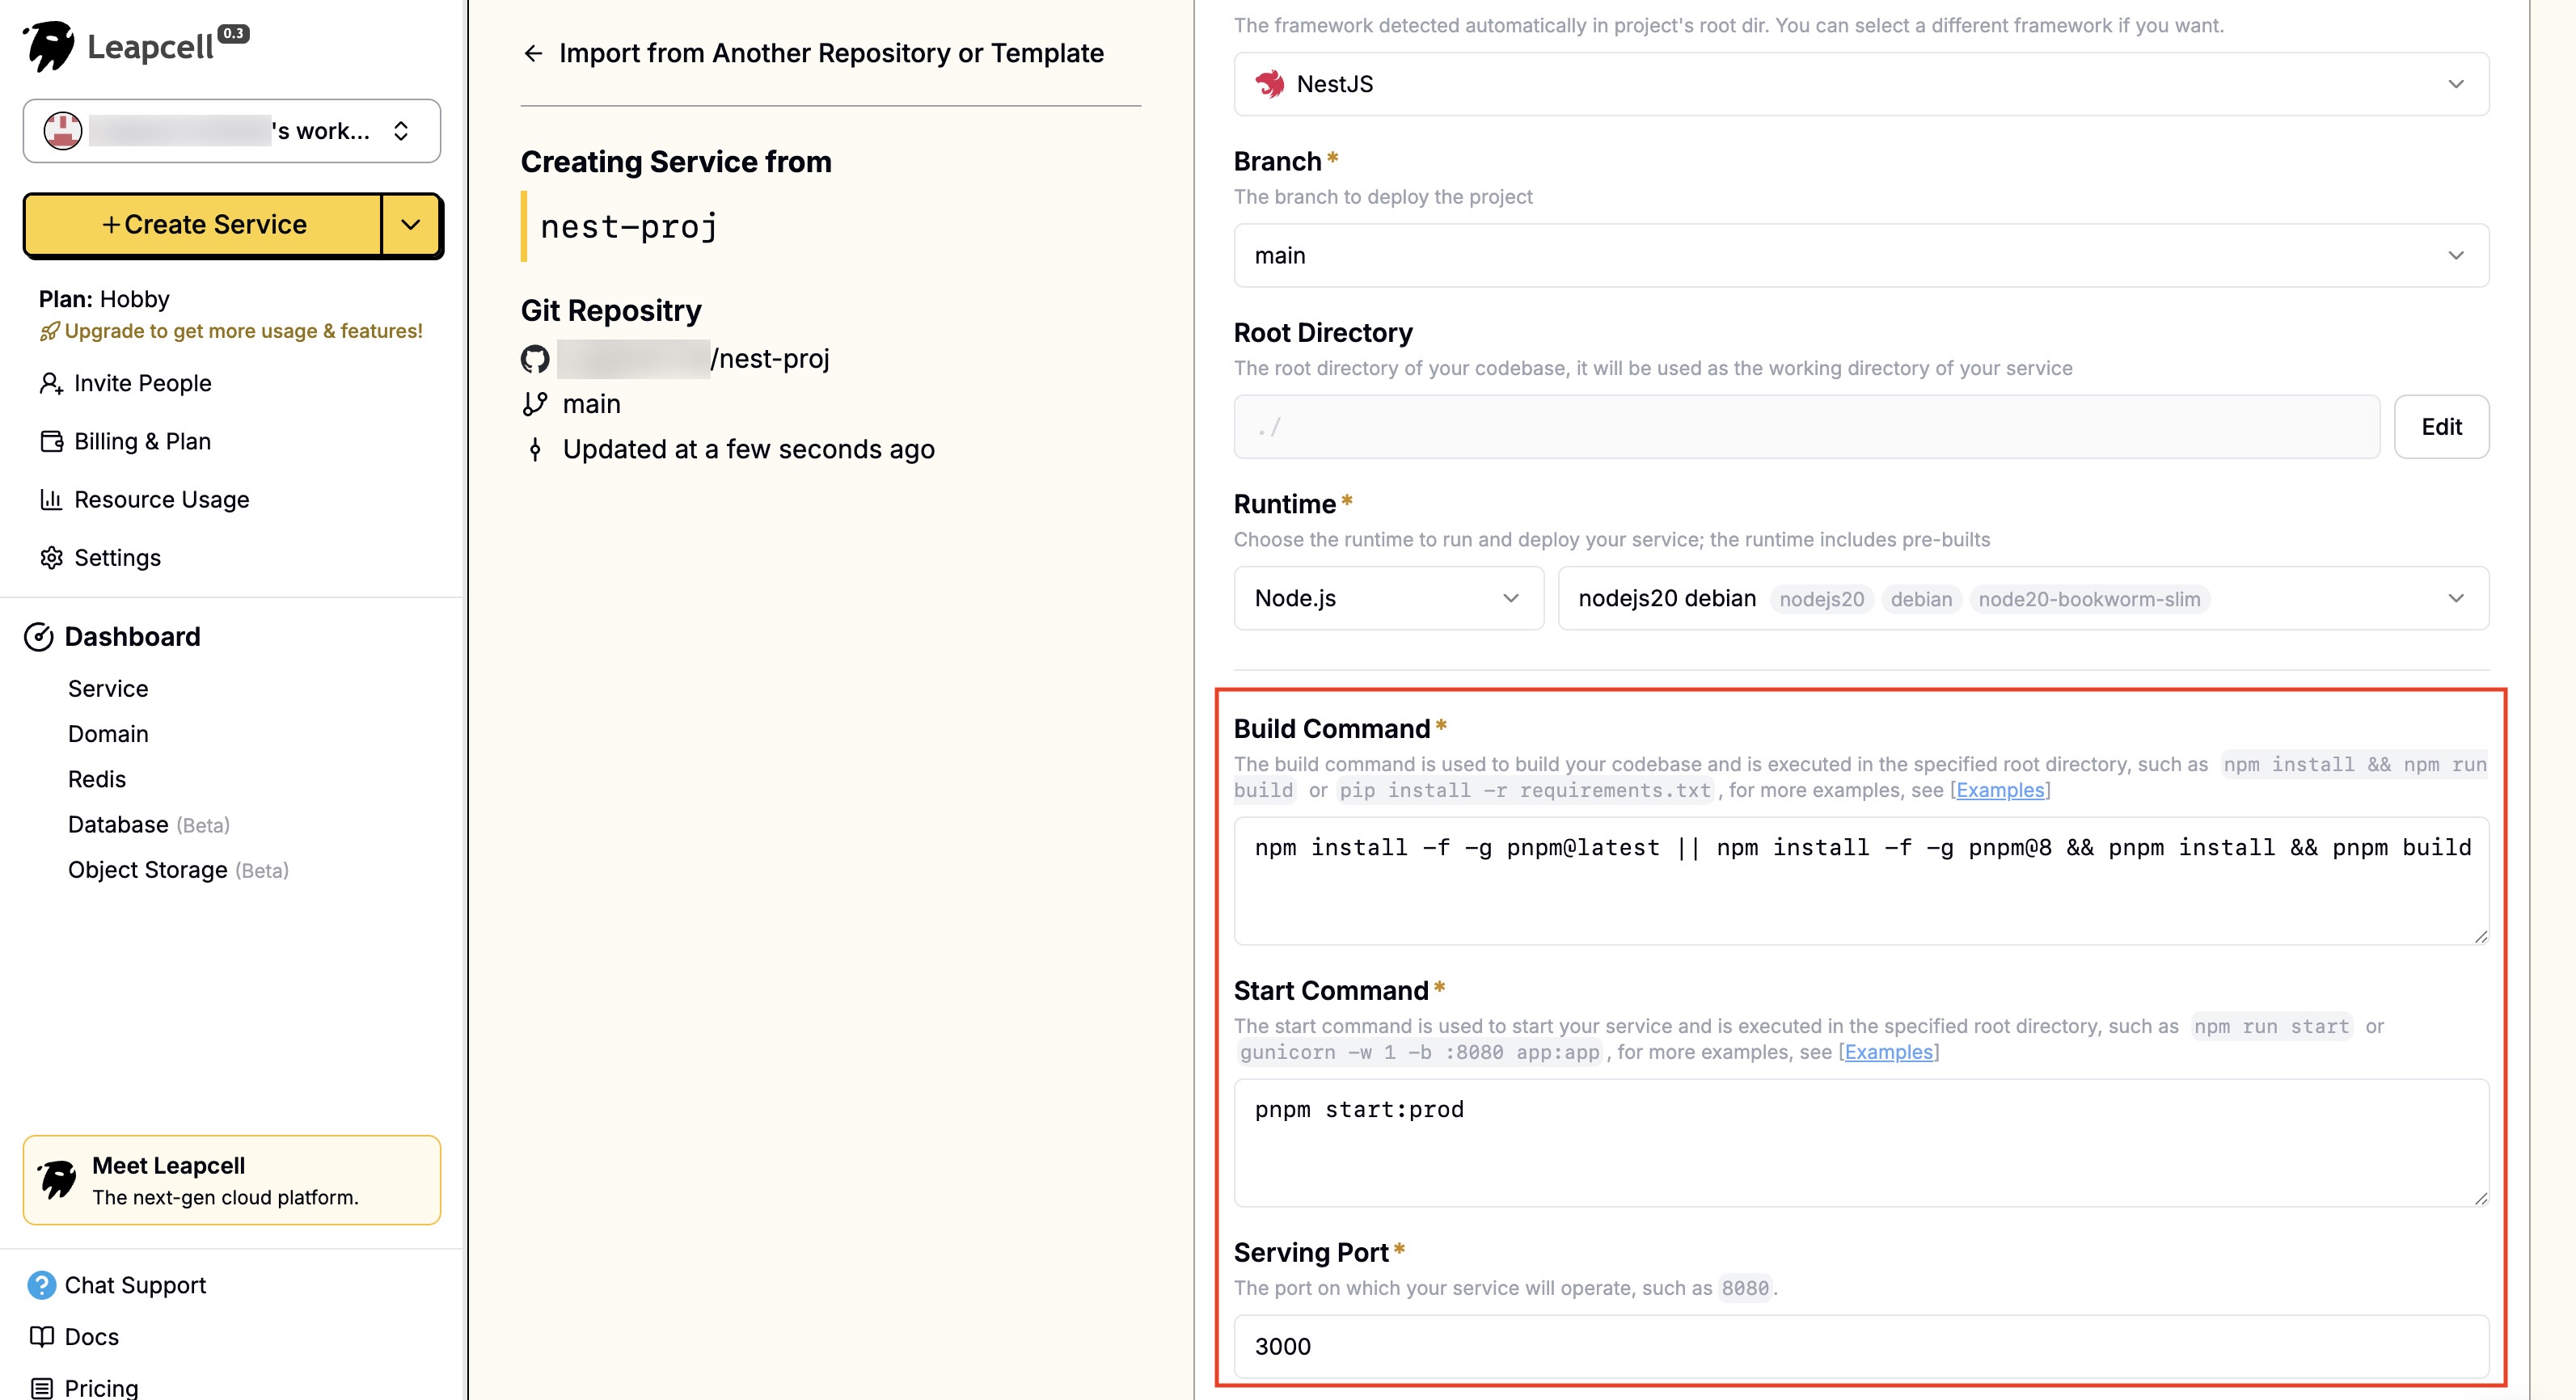
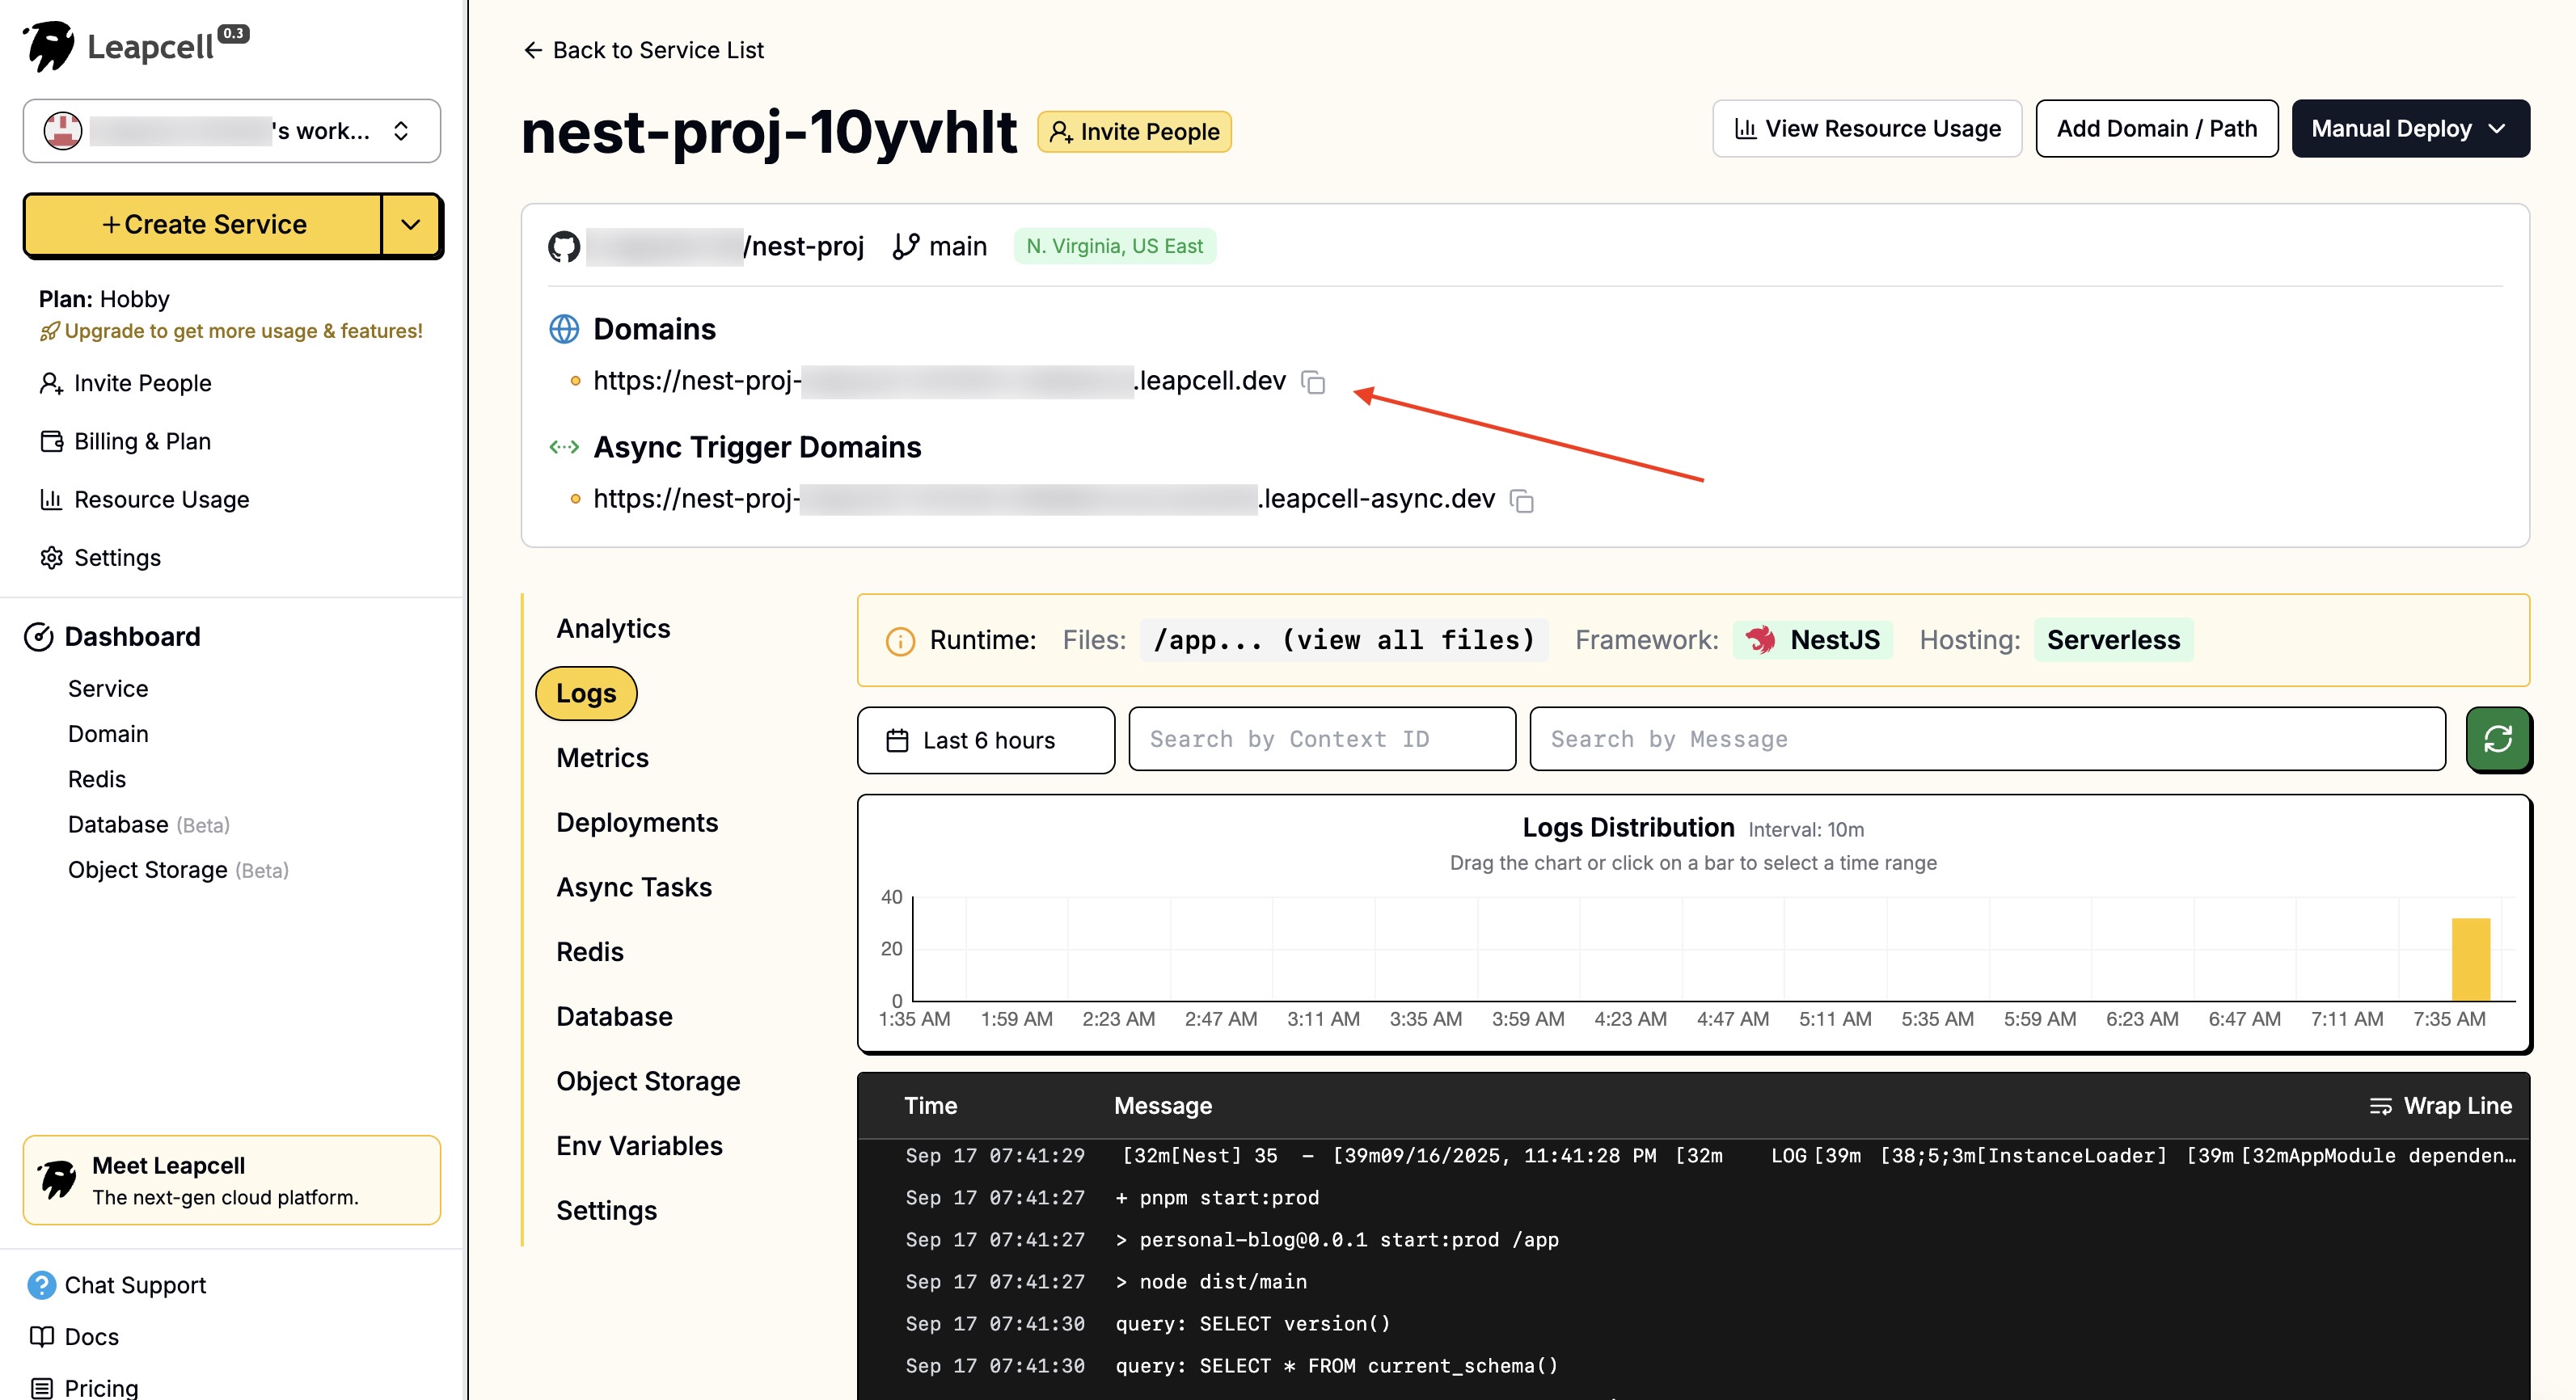
- Click "Submit" at the bottom to deploy. The deployment will complete quickly and return you to the deployment homepage. Here, we can see that Leapcell provides a domain. This is the online address for your short link service.
Now, your short link service is live, and anyone can access your short links on the internet.